
Moon Setting among Rock Formations.
[873 words; Reading Time: 4 minutes 20 seconds]
White Desert, near Bahariya, Egypt.
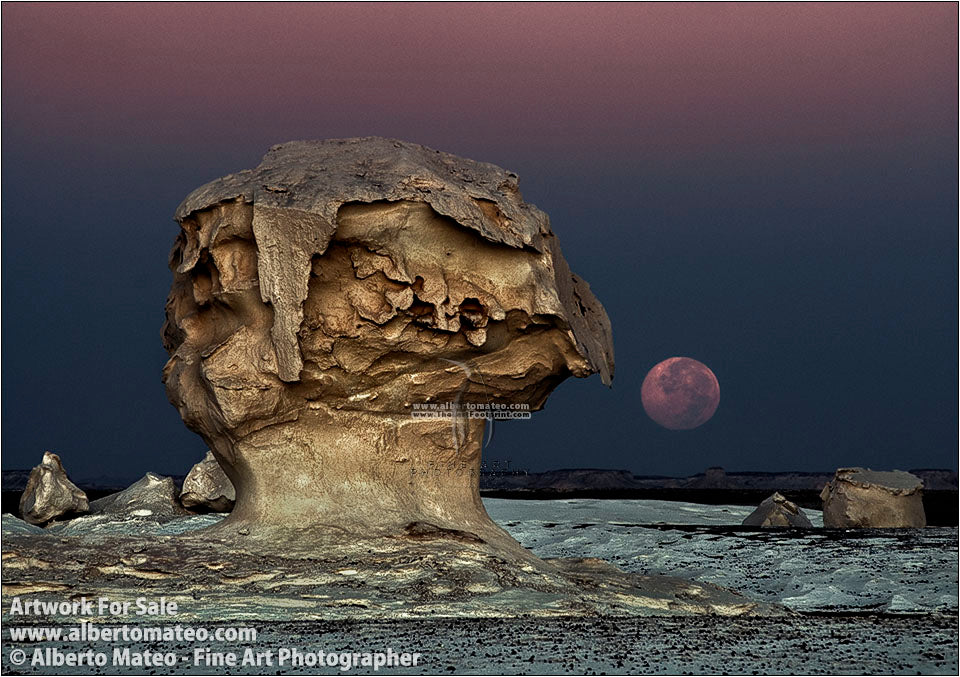
The White Desert is one of the most intriguing places you can go to photograph landscapes to. It is an extension of desert in the mid of Egypt without sand Dunes, but full of Rock formations eroded by the wind. Many stones have different curious shapes, some of them reminding animals and plants. There is a chicken, a rabbit… the mushrooms… even a “face”… a place that is really worth a visit for Photographers.
I went to the Desert when I knew I was going to have full moon. My first idea was to photograph the desert by night and I did, but the best pictures did not come under full Moon light. I woke up at the hour I had looked on internet that the moon was rising for that night (I believe it was somewhere around 23:00, sunset was around 18:00) and shot many images with my wide angle and my D200 on a ‘Manfrotto 055 Pro’ tripod. The resulting images were nice, but the best was yet to come. Before I went into my sleeping bag, I set my alarm at 4:00 (sunrise was going to be around 5:00) and begun to take pictures when it was still by night, with the rocks lighted just with the Moon light.
Dusk light is maybe the most delicate of all the day. For landscape photographers it is a jewel. It is the time of the day when two lights collide, the transmitted light and the direct one that came from the Sun.
Dusk began thirty or forty minutes before sunrise. The sunlight appeared on the horizon as a bright red-yellowish clarity.
From one part of the planet the dark bluish light of the night mixes with the yellowish light of the new day creating on the sky a line of colors that rise on the horizon and give very soft but directional light that creates marked but very soft shadows.
The light that comes from the dark part of the planet has suffered many rebounds on Earth surface and the atmosphere, hence the wave lengths are biased to blue (it is said that it is transmitted light), while the light that comes directly from the sun comes directly from the Sun to the Earth, in red and yellow colors. That is why if you look to the photograph, you can see the Moon and the upper part of the sky in red/magenta (warm) colors, while the lower part of the sky and the horizontal ground are in blue/cyan (cold) colors. The rock itself is beginning to be illuminated by the Sun, hence it is in Yellow colors.
The two lights produce a gradation, and the line in the sky where they mix is called ‘the light wedge’. During day hours the light that comes directly from the Sun is much more powerful than the one that comes from the dark part of the planet, and vice versa, by night the scattered light that comes from the darker part of the planet is more powerful and overwhelms the other type of light. It is only at dusk when there is a balance of intensity between both, and the light produced (if you are in an open space under a clear cloudless sky, as usually happens in the desert), is very special for landscape photography.
Dusk light is maybe the most delicate of all day. For landscape photographers it is a jewel. It is the time of the day when two opposed lights collide.
When you are using a focal length of 600mm a sturdy and heavy tripod is an absolute must. Forget any small, short legged, toy tripods. If you want to shoot by night and use a telephoto, buy a real HEAVY tripod.
The eroded shapes of the rock formation gives the picture and abstract sense that is counterbalanced by the rounded shape of the moon, but I believe that the most interesting character in this picture is the soft light itself, so revealing.
It is not very common that the Moon sets exactly at sunrise. It does not happen during all the year around, so you cannot count on it unless you look for it. Check some astronomy or astrophotography web sites to look for the coincidence.
NOTES ABOUT GEAR:
The lens used was the Nikon 80-200 2.8 AF (used at 200mm) with a 2x Duplicator. A 200mm is converted to a 300mm in an APS sensor size (the one of the Nikon D200 I was using) which has a multiplying factor of 1.5. With the Duplicator the real focal length I was using was a 600mm f5.6.
When you are using a focal length of 600mm a sturdy and heavy tripod is an absolute must. Forget any small, short legged, toy tripods. If you want to shoot by night and use a telephoto, buy a REAL tripod.
EXIF DATA
Shooting Prameters: ¼ second; f8; ISO 100
GEAR LIST:
Camera Body: Nikon D200;
Lens: Nikon 80-200 AF D used at 200; Duplicator 2x;
Real resulting focal length used: 600mm
Filter: B+W 77mm Skylight 1A Multi Coated (2C) Glass (KR1.5)
Memory Card: Sandisk Extreme 16Gb
Tripod Legs: Manfrotto MT055XPRO3 3 Sections;
Head: Gitzo G1372M Magnesium Alloy 3-Way Head
Have you liked this post? If so you can SUBSCRIBE to The Last Footprint to receive the last updates, learn photography and get travel tips. It is FREE and you can unsubscribe whenever you want.
0 comments